I DO NOT ACCEPT ANY KIND OF RESPONSIBLITY FOR BRICKED DEVICES SO PROCEED WITH CAUTION !
System Repartitioning for Whyred | If you have the custom recovery installed on your whyred mobile, then you can repartition it. Read the article for info on how to do it.
Download parted from the link: Here
Steps to perform System Repartitioning for whyred:
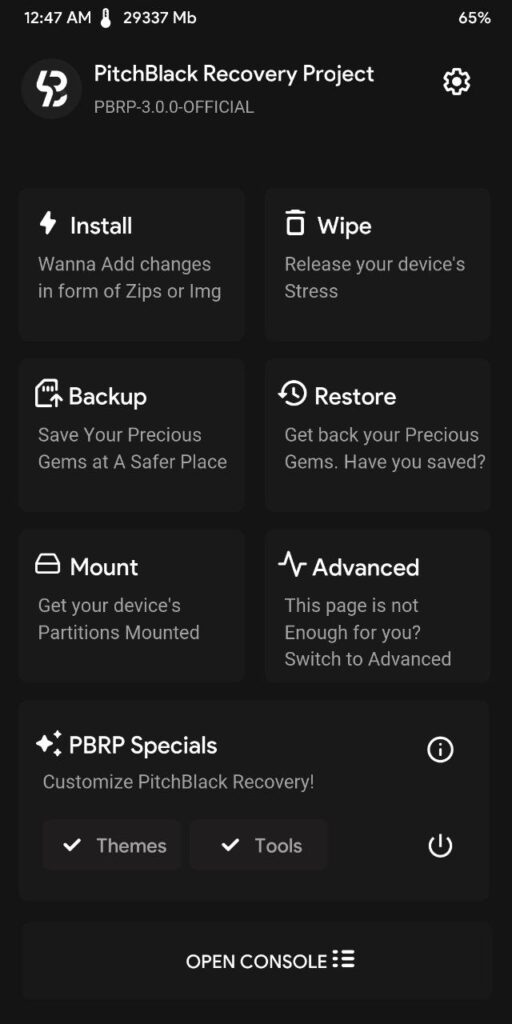
1. Reboot to custom Tmpgenc Authoring Works 6 Crack Keygen recovery which you have installed.
Pitch-black recovery home.
2. Move parted from your scared to /tmp folder and give 777 permission.
3. In recovery terminal, type cd/tmp and then ./parted /dev/mmcblk0
key malwarebytes 3.2.2
4. Type p and start removing your partitions until and including system while checking up your partition list.
rm 64 = erases userdata
rm 63 = erases cust
rm 62 = erases vendor
rm 61 = erases system
5. Now that you have erased them, you can start recreating them one by one:
mkpart 61 = Creates system. Now it will ask for the partition name, so type system. Then it will ask for the partition system, type ext4. Next, it will ask for starting and ending points. What you have to do is to check number 60 in the partition list and see its end point. The new partitions will always begin with the ending point of the previous partition. For example, 60th partition ends with 2250. Then the 61 partition must start with 2250. What about the ending point? It is totally up to you to decide. If you want a 6GB(6000mb) system partition, 2250 + 6000 = 8250 is then your ending point and that’s all.
mkpart 62 = Creates vendor. Do everything like the previous step with the only exception of partition name which is vendor. Remember that vendor must be more than 2GB(2000mb).
mkpart 63 = Creates cust. This partition isn’t really necessary so you can just give it 50mb.
mkpart 64 = Creates userdata. Ending point is a bit difficult to figure out with this one. So, I always trying with 65000 and keep decreasing the value until it works out. 62000 does it for me.
6. Now we have to name these partitions but let’s first check what we’ve done so far by typing p. If everything is okay then the next step is easy. Simply type exactly what is below:
name 61 system
name 62 vendor
name 63 cust
name 64 userdata
7. After this, do another check by typing p and if all is okay, then quit by typing q then reboot into recovery again.
8. This is the last step. We have to format these partitions to get started. Again type exactly like what is below:
mke2fs -T ext4 /dev/block/mmcblk0p61
mke2fs -T ext4 /dev/block/mmcblk0p62
mke2fs -T ext4 /dev/block/mmcblk0p63
mke2fs -T ext4 /dev/block/mmcblk0p64
Another quick reboot into recovery and you are done, congrats/