
Welcome to another Valorant blog, Today we will discuss the common errors frequently encountered by the Valorant enthusiast, which is the need to enable Secure Boot to launch the game smoothly.
This error commonly occurs during the initial installation of the Valorant on your PC or when the players upgrade their PC from Windows 10 to Windows 11.
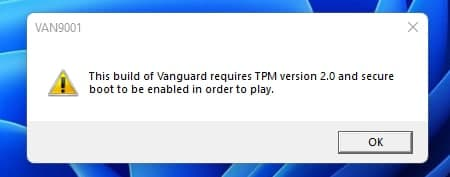
As soon as you launch Valorant, the game exits with an error, “This build of Vanguard required TPM2.0 and secure boot to be enabled to play”. This is followed by an error code: VAN 1067, leaving you only the option to quit the game.
Our main focus in this blog “How to Enable Secure Boot For Valorant?” is to provide a complete walkthrough on activating Secure Boot directly from your BIOS settings.
Join us as we navigate through the steps, ensuring seamless gameplay and addressing this common concern head-on.
Step-by-Step to Fix the Error
Follow these steps to get rid of this error:
Restart Your PC
The first step to solve this error is to restart the computer, so you can access the BIOS. You can restart your PC by pressing the window button and then opt for the power button, there you can see two options: One is Shutdown and another one is Restart. Click on the Restart button to initiate the process.
Access the BIOS
While your PC is restarting, you need to access the BIOS by pressing some specific keys, continuously. Keys can be Del, F2, F10, F11, or, F6 depending on your motherboard’s model and make. Another way to get the identical keys for this press is to specifically search online about it.
Navigate the BIOS
Once the BIOS appears, you need to go to the advanced settings, to enable the secure boot. Depending on the motherboard manufacturer, the BIOS screen may vary. However, you don’t need to try anything different.
Enable the Secure Boot
Select the secure boot option after you have found the advanced settings. In some cases it cannot be found in the advanced settings, they have a separate option for secure boot. After locating the Secure Boot, you need to select the OS Type “Windows UEFI Mode” and change the Secure Boot mode to “Custom”.
Save and Reset the PC
Make sure to save your settings after turning on Secure Boot. Although the method for preserving configurations may differ throughout BIOS models, you will typically discover a feature to both save and reset the BIOS.
After the modifications have been saved, your computer will restart. Your system is now successfully configured with Secure Boot enabled.
How to Check Secure Boot Enabled?

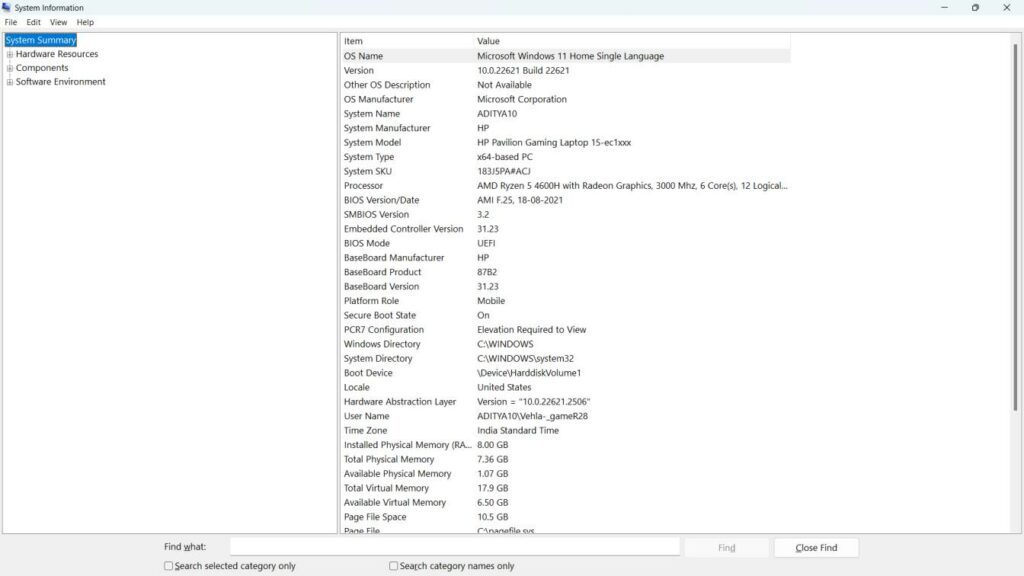
To check the Secure boot enabled, you need to press the Windows+R keys at the same time. Then type in the box “msinfo32” and click on the button OK. A screen will appear as given following, showing the BIOS Mode and Secure Boot State.
Final Words
After following the steps given in our guide “How to Enable Secure Boot For Valorant?” you should be able to run the game smoothly. If you have any other problem regarding the Valorant or any other game. Don’t hesitate, Just DM us on our socials.